Wednesday, January 26, 2011

TEN!

The little man turns 10 months old today. I can barely believe it every time one month goes by. Everyone always says it goes by so fast, but you really only notice it when it's actually happening to you. Addison is up to quite a bit these days. He's started pulling up to standing in his crib. I can always tell when he's standing up after a nap, cause he starts babbling away. I open the door and say "I hear a baby", and he starts grinning from ear to ear. That may be one of my absolute favorite things right now. Although he pulls up in his crib, he's having a harder time pulling up on other things. But if I stand him up next to the coffee table, he's on the move! He's successfully figured out how to go all around the coffee table, and even gets himself over to the bookshelf next to the couch and coffee table! I'm excited, yet nervous at the same time...guess it's time to start baby proofing :) We're on to stage 3 foods now, which means lots more chunks! It's been fun showing him new foods and textures, and letting him have some of our food from time to time. I know I'm completely biased, but he really is just one of the sweetest babies I've ever known. He smiles at most everyone he meets, whether it's at the YMCA, Church, or the grocery store. It's so sweet to see him interact with people, and I love it even more that he brings so much joy to the people he comes in contact with. We cannot get through the grocery store without at least a few people stopping to talk and interact with him. I love it!

So in honor of little man turning 10 months, I've decided that this week, I'm going to share how I make his little numbered onesies. I promise it's super easy...so here we go!

Supplies:
Small scrap of fabric for number
onesie
steam a seam double stick fusible web, heat bond or other double stick fusible web
scissors
thread
marker
iron
sewing machine (optional)


Step 1: Either draw or print out the numbers you'd like to put on your onesie

Step 2: Outline your numbers onto your fusible web. If you're using the steam a seam, you'll notice that one of the papers will peel away easily. You'll want to trace your numbers onto the side that doesn't peel. Also, make sure you trace your numbers backwards.

Step 3: If using steam a seam, peel away the one layer, and lay the outline of your numbers sticky side down onto the WRONG side of the fabric as pictured below. Apply a little pressure all around the number to make sure it sticks to the fabric.

Step 4: With the paper backing still on, cut your design out.

Step 5: Once your design is cut out, remove the paper backing, place it on your onesie, and with a hot iron, and NO STEAM, iron your numbers down.

Now, the steam a seam packaging says that it's a permanent bond when ironed on. I find it to be more of a semi-permanent bond. But if you like the way it looks, and you're not planning on using this as an every day onesie, you can definitely stop there and leave as is. If not, go on to step 6!

Step 6: Sew your numbers onto your onesie. I said in the supplies list that sewing machines are optional, and they are. All you need to do is get some thread, a needle and hand stitch the numbers in place. However, if you have a sewing machine, I highly recommend using it, as it will take a lot less time, and the edges will look a little cleaner.

I use the zig zag stitch when outlining the numbers (Button 2 in the picture below)


Carefully go all the way around the edges of your numbers, getting as close to the edge of fabric as possible. A quick tip on maneuvering around corners: When you get to a corner, stop with your needle still in the fabric, lift your presser foot, turn your work, lower the presser foot and keep sewing until you get to the next corner. Rounded edges are a bit trickier, so just go extra slow when you get to those.

Snip off all of your loose threads and you're finished!


Now, just throw that onesie and an adorable little tyke, and snap away!

*Someone woke up on the wrong side of the crib this afternoon...this was the best we could do*

Obviously, all of these instructions apply to any other kind of design you'd like to attach to a shirt. As always, be creative, and don't get frustrated if it doesn't turn out exactly how you want it to the first time. Practice makes perfect...so get to it!

Did I mention that it snowed in Nashville...AGAIN! If I wanted to clear away the snow on my car every morning I would have stayed in Buffalo! You can go away now winter and snow :) Enjoy your Wednesday everyone!


Friday, January 21, 2011

A craft a day...

You know what they say...a craft a day keeps the doctor away :) I know that may not be exactly how it goes, but I am determined this year to craft a bit more, and I hope that you will join me. I am the sort of person who loves to figure out how to do things on their own. I find myself so many times browsing through the stores I love, oogling over items, that are just a little too pricey for my pocketbook, and thinking to myself "I could make that". With so many things on my list of "I could make that", plus other ideas I've had bouncing through my brain, I'm giving myself the goal of creating one thing off of that list each week. In addition to making these things, my goal is to create tutorials so you can join in as well!

I'm going to call our first project Wood Slice Embroidery...
cause I don't know what else to call it.

Supplies:
Slice of wood (can be bought at any craft store. I used a 40% coupon and Joanns or Michaels, and got mine for uber cheap!)
Design
Hammer
Nail
Drill with various drill bit sizes
Double sided tape
Embroidery floss / Yarn / Ribbon / Strips of fabric
Darning Needle


Step 1: Create your design and attach to wood slice
I used photoshop to create mine. I like the simple starbursts, and it's a really easy design for your first time. The dots in the design are where I want to drill my holes. I used double sided tape to attach to the wood slice so it would stay in place. Be sure to put the tape where there isn't a design.

Step 2: Transfer your design to the wood.
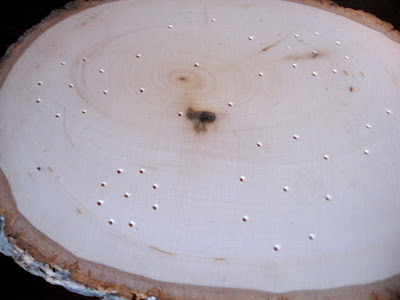
Using the hammer and nail, tap a small hole wherever you would like to drill a hole. It doesn't need to be deep at all. It's just a guide. Remove your paper design when you've marked all of your holes.

Your wood should look something like this when finished

Make sure you keep your paper design out and use it as a reference, especially if your design is a bit complicated

Step 3: Drill your holes.
I think that's pretty self explanatory...right? One thing to note though, the larger your thread/yarn/fabric strip is, the bigger drill bit you're going to need. Also, If you're going to be passing your needle through one hole multiple times (like the middle hole in this design) you're going to need to drill a bigger hole then ones where your needle is only going through once. For this project, for the embroidery floss I used 5/64th bit for the outer holes, and a 3/32nd bit for the inner. For the fabric strip (yellow starburst) and the yarn, I used a 1/8th for the outer holes, and a 9/64th for the inner. I have no idea what those number mean...I'm just writing what is written on the bit! Ha!

Step 4: Embroider your design.
Using your darning needle and floss/fabric/yarn, start from the back of the wood, push your needle through, back to front, and then go back through the wood front to back in the next hole.

You can really use whatever you'd like to embroider your wood slice. I used embroidery floss, 1/4 strip of fabric, and yarn. Be creative!

Tie off your loose ends when finished


Voila! It's so simple, but I love em! I definitely plan on doing this one again.


With a little prep, this would be a great craft for kids! Just pre-drill the holes, and let them sew away!

The possibilities are endless with these little ditties. You could embroider initials, sayings, drawings, anything!

I hope this little tutorial has been helpful for you! I'd love to get some feedback from you guys if you're trying this one out, and of course I'd LOVE to see pictures as well! I went ahead and created a group on Flickr "I Could Make That" . I've never actually made or joined a flickr group before, so if I'm doing something run...someone please tell me :)

Happy Crafting!

Friday, January 14, 2011

Is it really Friday already?!

Can I toot my own horn for a second and say I worked out every morning this week!! There were a couple mornings it took everything in me to get up, stretch and get ready to go to the Y. Little buddy has been a little off with his nights this week. For some reason he's been waking up around 4 or 5 in the morning, and a couple times at 11. I really don't know what's up with him, maybe he's teething? But it makes for a really long night, and an even more tiring morning.

I finally made a couple bibs out of laminated cotton! Never again will this babe of ours be wearing a cloth bib when it comes to meal time. They're just such a pain in the behind, and don't always come clean when washed. The laminated cotton wipes clean so easily...it's amazing! So I went to my favorite local fabric shop Textile Fabrics, and got myself some houndstooth laminated cotton!


This little bib comes complete with food catcher and a snap...so he can't take it off :) I've already made a couple, and definitely plan on making more. I think I may even try to sell a few in my etsy shop. I think every mom needs to have a couple of these, and there are some wonderful laminated cottons out there...especially for sweet baby girls.

A second project I finished (but didn't really plan on) are these adorable granny square slippers! I had started them awhile ago, and decided to finish them as a gift, but I felted them too long, which made them a little too small for the intended recipient, so now they're mine...I'm not complaining :)


If you crochet, you can find the pattern on ravelry here

We have a fun little weekend planned, and there's much to do to prepare, so I'd better get going! Enjoy your weekend :)

Monday, January 10, 2011

A view from our Bungalow...

Woke up to this beautiful sight this morning...


I wouldn't want to wake up to it every day mind you...I did that the first 20 years of my life. But every once in awhile, the soft powdery stuff is just what I need. I'm imagining all of the kiddos out there getting layered upon layered with clothes, getting ready to go sledding, or build some snow forts. I really hope we get a good snow like this next year, so I can share my favorite childhood winter games with our little buddy!

Until then...be save and have fun all you snow bunnies out there!

Friday, January 7, 2011

New Year, New Start

This is my first non-baby related post in quite sometime, and it is LONG overdue.

They say 9 months to gain the weight, 9 months to loose it...well Addison is 9 months old, and I still have some lbs to shed. 10 will get me to pre-baby weight, but I'm setting my goal a little higher, as I wasn't in amazing shape to start off with. So my new goal is 20 lbs in 3 months, which will put Addison at 1 year old! I think that's doable...right?

I wish I were, but I am not a very self motivated person...so Russ and I did the very cliche thing at the beginning of the year, and became members of the YMCA. New year, new start. Our Y offers loads of great classes, and has both an indoor and outdoor pool. So far, 1 week in, I feel great! I've started the Couch to 5k program all over, running 3 days a week, and then taking classes (upper body sculpt, butts and guts, and pilates) 3 days a week. Can I just say that so far this has been one of the best decisions we've made? It feels great to have an hour or so all to myself to just think, run, be active, all the while Addison is enjoying some play time with other kids...win win in my opinion. And, when they open the outdoor pool, I fully intend on taking advantage of the free daycare and sitting by the pool for an hour or so all by myself...does that make me a bad mom? ha. Don't worry, after I've gotten my sun, I'll snag the little guy and play with him in the pool too :) Currently I'm feel pretty determined and motivated to stick to our morning routine...I'll let you know how it goes!

Another "New Year, New Start" thing for me is cooking. I truly admire all of you out there that can just throw ingredients together, and make something absolutely amazing. Give me yarn, fabric, or something else crafty...I can hang, but cooking is just not my thing. But I'd like it to kinda be my thing, so with the help of dear Martha, I've been looking up healthier recipes, and trying one out each night this week. So far, every recipe has been a complete success, including my first ever quiche last night! I still have a couple more to try out this week, but am on the hunt for more for next week. If you have a healthy yummy recipe you love...PLEASE send it my way :) It truly is rewarding to put a little hard work in to get something pretty great out of it. Now if I could just learn to love cleaning, I just might be the perfect little housewife...haha.

Of course there are tons and tons of new projects I'd love to tackle this year, including repainting our living room, redecorating, and lots and lots of art projects. But I'm REALLY excited about a little handmade exchange I've become a part of. You may have seen posts like this roaming around facebook (including mine), but basically I made a post and the first 5 people to respond I will send something homemade too...and they will each send me something homemade, as well as the 4 others that responded first. Then they have to repost. I love that I get to make things for some people I know, and others that I don't. And I cannot wait to get some lovely handmades in return :)

I'm so thankful and blessed to be where I'm at right now. This weekend I get to spend it with my two favorite boys in the whole wide world, and I cannot think of anything better then that!

Enjoy your weekend!


You didn't think I'd go without posting a new picture of this little man did you?

Wednesday, January 5, 2011

Um...

I don't really know what happened, but I just now realized that I have yet to post both Addison's 8 and 9 month pictures...Yikes!

UGH! I'm totally thrilled and excited to see him grow and learn how to do new fun things...but where did my teenie tiny baby go?! The cuddling days are pretty much over (with the exception of nap time). But there are so many other sweet things he's been doing of late. He claps when we ask him to. He plays peek a boo with us. He's starting to wave to say hello and goodbye. He feeds himself (carrot sticks, banana, and these little sweet potato puffs). It gets everywhere, but thankfully we have our faithful pups that keep the floor clean...ha.

We're not quite crawling yet...although when motivation strikes, he makes it happen...


And if you can walk (with a little assistance) who needs to crawl!


His bright smile, and contagious giggles never cease to amaze me. We are so thankful and blessed to have this little guy in our life.